记录下对博客主题和功能的一些折腾
配置文件用途
根目录下的文件 ./_config.yml,这个文件是 hexo 的配置文件,指定了网站名、favicon、md 渲染器、博客主题等基本信息
./themes/<THEME_NAME> 下的 .themes/<THEME_NAME>/_config.yml,是对应主题的默认配置文件根目录下的./_config.stellar.yml,是 stellar(我的博客主题)的配置文件,优先级高于默认配置文件,建议对主题的修改都在这个文件中进行,注意这个文件需要自己创建
如果有一些博客有特定的配置需求,可以在其信息头部分(开头由 --- --- 包裹的部分)进行修改,优先级最高
评论区配置
本文使用的是 giscus 评论插件,stellar 可以使用的评论插件可以在官网查看,在配置文件中对应的 comments 部分:
评论插件 1 2 3 4 5 6 7 8 9 10 11 12 13 14 15 16 17 18 19 20 21 22 23 24 25 26 27 28 29 30 31 32 33 34 35 36 37 38 39 40 41 42 43 44 45 46 47 48 49 50 51 52 53 54 55 56 57 58 59 60 61 62 63 64 65 66 67 68 69 70 71 72 73 74 75 76 77 78 79 80 81 82 83 84 85 86 87 88 89 90 91 92 93 94 95 96 97 98 99 comments: service: comment_title: 快来参与讨论吧~ beaudar: repo: xxx/xxx issue-term: pathname issue-number: theme: preferred-color-scheme label: input-position: top comment-order: desc keep-theme: loading: false branch: main utterances: repo: xxx/xxx issue-term: pathname issue-number: theme: preferred-color-scheme label: giscus: src: https://giscus.app/client.js data-repo: xxx/xxx data-repo-id: data-category: data-category-id: data-mapping: pathname data-strict: 0 data-reactions-enabled: 1 data-emit-metadata: 0 data-input-position: top data-theme: preferred_color_scheme data-lang: zh-CN data-loading: crossorigin: anonymous twikoo: js: https://gcore.jsdelivr.net/npm/twikoo@1.6.8/dist/twikoo.all.min.js envId: https://xxx waline: js: https://gcore.jsdelivr.net/npm/@waline/client@3.1.3/dist/waline.js css: https://gcore.jsdelivr.net/npm/@waline/client@3.1.3/dist/waline.css meta_css: https://gcore.jsdelivr.net/npm/@waline/client@3.1.3/dist/waline-meta.css serverURL: https://waline.vercel.app commentCount: true pageview: false artalk: css: https://unpkg.com/artalk@2.7/dist/Artalk.css js: https://unpkg.com/artalk@2.7/dist/Artalk.js server: placeholder: '' darkMode: auto
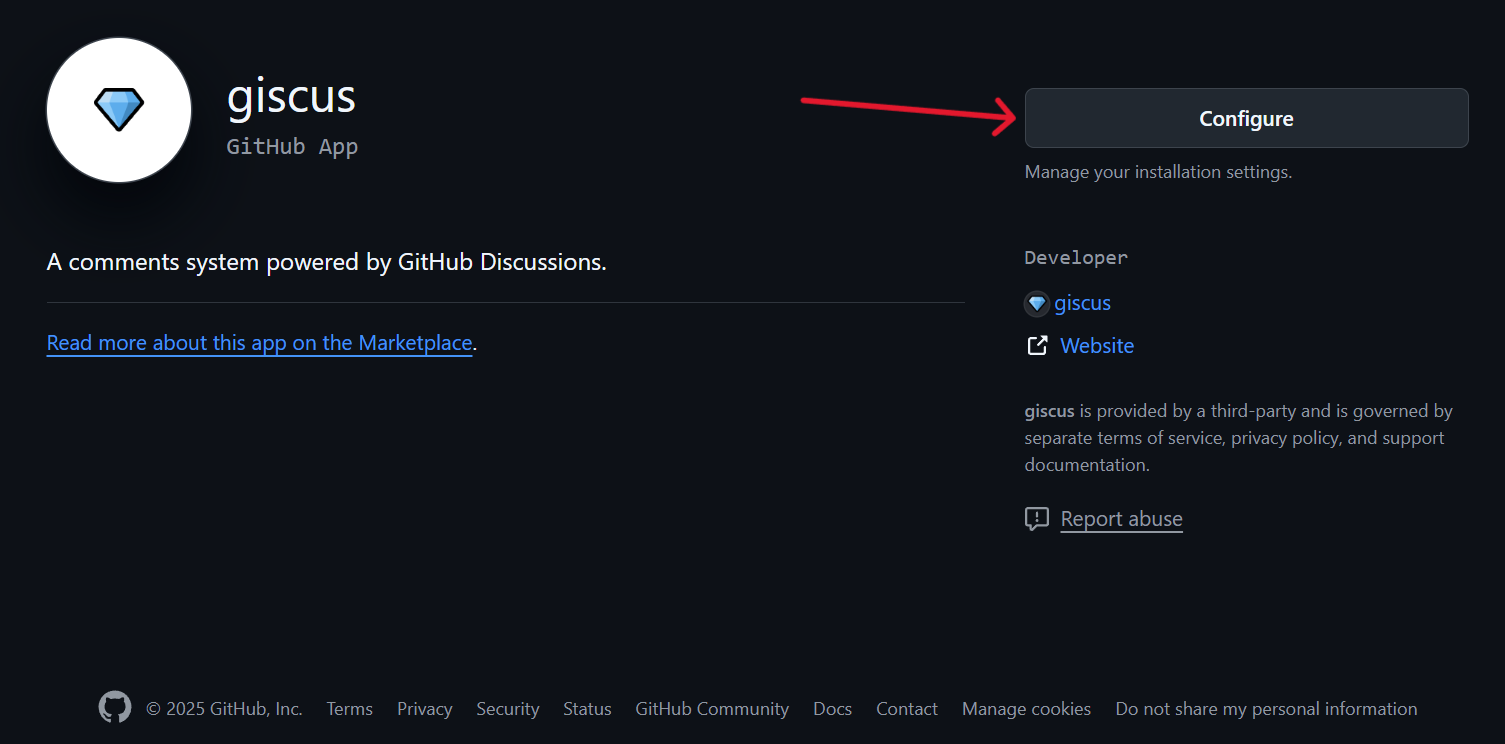
giscus 是基于 Github Discussion 来实现的评论插件,每个页面的评论区对应一个 discussion,因此需要基于一个 github 仓库来记录评论,操作方法为
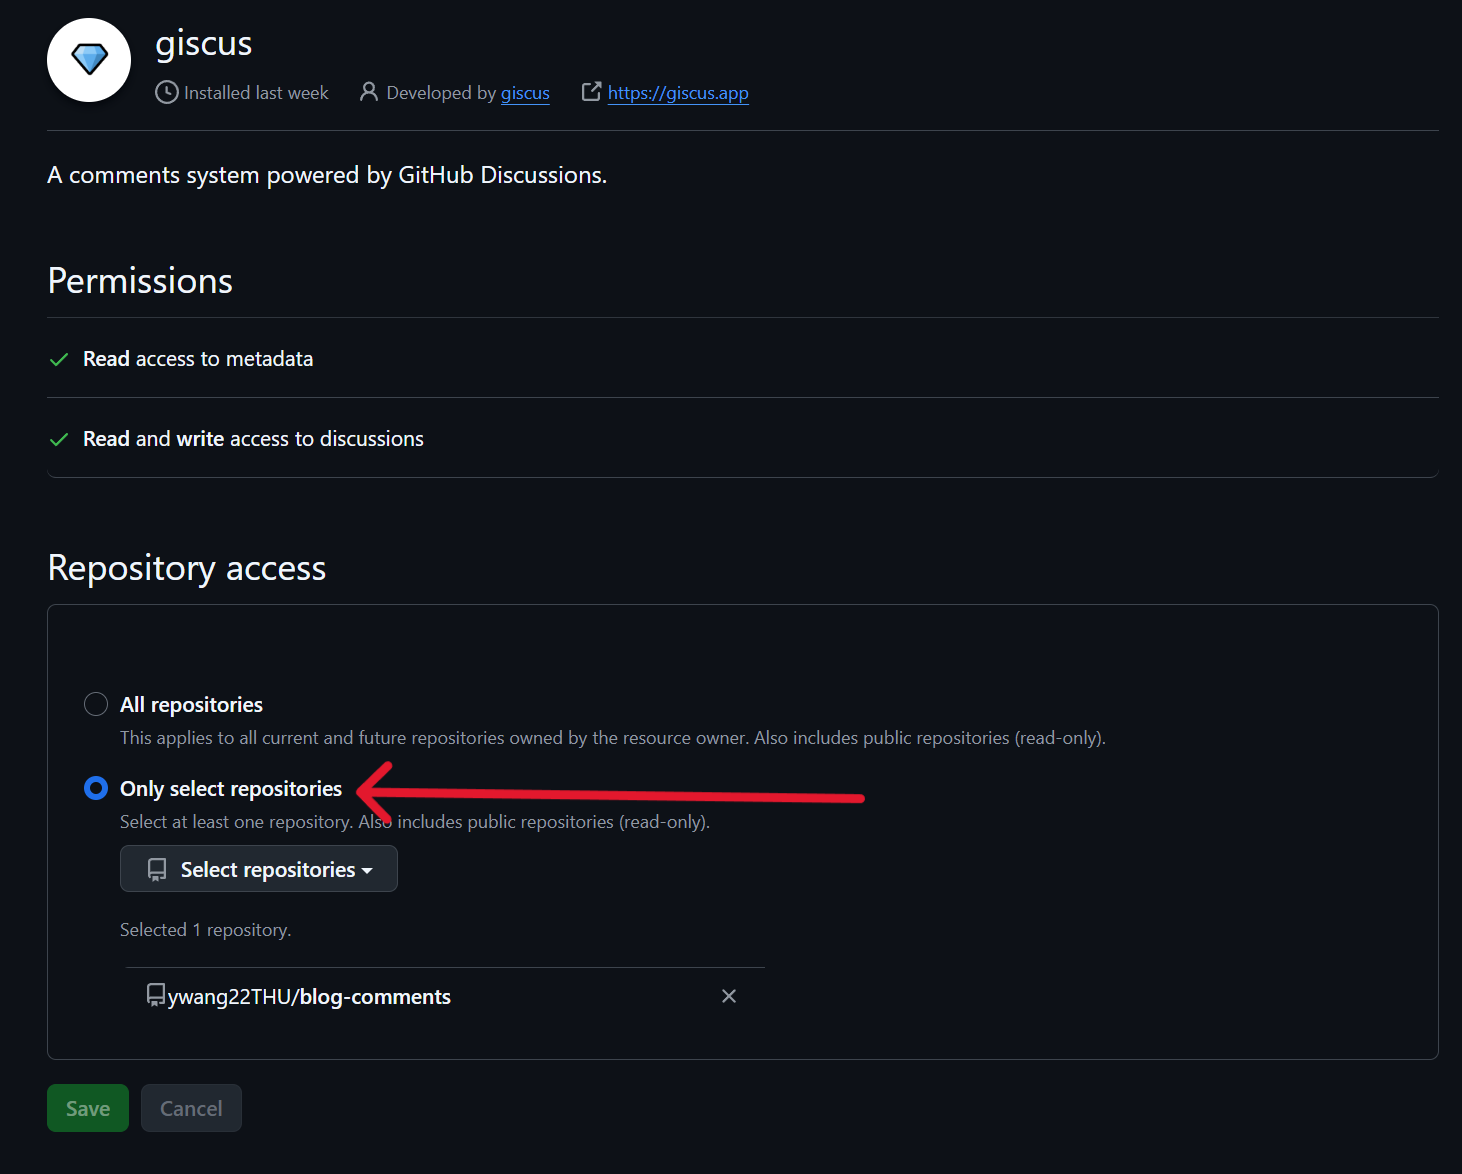
打开 repo 的 Settings -> Generals -> Features -> Discussions 选项
在 repo 的 Discussions 标签页中,新建一个 announcements 的讨论,这能确保新的 discussion 只能由 repo-owner 和 giscus 创建
访问 Giscus 网页上,往其中的 配置 部分填入 repo 的有关信息
填写完成之后,在下方的 启用giscus 部分会显示一个 <script> 标签,其中包括了配置文件中所需要的 data-repo-id 等信息,直接复制到配置文件中对应位置即可
如果希望让评论区的字体也是用 stellar 的正文字体 LXGW-wenkai,可以将配置文件中的 data-themes 改成 https://cdn.jsdelivr.net/gh/L33Z22L11/giscus-theme/lxgw-wenkai.css
页脚信息配置
在页脚希望能够展示一些数据,包括创建时间、访问次数、博客数量等
访问次数等信息是由外部不蒜子插件统计,因此可以直接写在配置文件的博客主题里;而博客数量等则需要读取网站的页面信息,而这个无法在配置文件中拿到,所以需要直接修改前端代码
网站信息
在 ./_config.stellar.yml 内添加
页脚网站信息 1 2 3 4 5 6 7 8 9 10 11 12 13 14 15 16 17 18 19 20 21 22 23 24 25 26 27 28 29 30 31 32 33 34 35 36 37 38 39 40 41 42 43 44 45 46 47 48 49 50 51 52 53 54 55 56 57 58 footer: content: | <center> <span> © 2024 本网站由 <a style="font-weight: bold; auto;" target="_blank" rel="noopener" href="https://github.com/FelicxFoster">Ywang22</a> 使用 <a style="font-weight: bold; auto;" target="_blank" rel="noopener" href="https://github.com/FelicxFoster/hexo-theme-stellar">Stellar</a> 创建 </span> <br> <!--不蒜子计数器--> <script async="" src="//busuanzi.ibruce.info/busuanzi/2.3/busuanzi.pure.mini.js"></script> <!--添加一个访问量--> <span>总访问 <span id="busuanzi_value_site_pv" style="font-weight: bold;"></span> 次 | 本页访问 <span id="busuanzi_value_page_pv" style="font-weight: bold;"></span> 次</span> </br> <span id="runtime_span"></span> <script type="text/javascript"> document.addEventListener('DOMContentLoaded', function() { var runtime_span = document.getElementById('runtime_span'); function show_runtime() { // 调用定时器 setTimeout(show_runtime , 1000 ); var seconds = 1000 ; var minutes = seconds * 60 ; var hours = minutes * 60 ; var days = hours * 24 ; var years = days * 365 ; var today = new Date(); var todayYear = today.getFullYear(); var todayMonth = today.getMonth(); var todayDate = today.getDate(); var todayHour = today.getHours(); var todayMinute = today.getMinutes(); var todaySecond = today.getSeconds(); var t1 = Date.UTC(2024 , 4 , 7 , 20 , 59 , 11 ); // UTC时间,月份从0开始 var t2 = Date.UTC(todayYear , todayMonth , todayDate , todayHour , todayMinute , todaySecond); var diff = t2 - t1; var diffYears = Math.floor(diff / years); var diffDays = Math.floor((diff / days) - diffYears * 365 ); var diffHours = Math.floor((diff - (diffYears * 365 + diffDays) * days) / hours); var diffMinutes = Math.floor((diff - (diffYears * 365 + diffDays) * days - diffHours * hours) / minutes); var diffSeconds = Math.floor((diff - (diffYears * 365 + diffDays) * days - diffHours * hours - diffMinutes * minutes) / seconds); // 更新显示时间的span元素内容 runtime_span.innerHTML = "🦉营业:" + diffYears + " 年 " + diffDays + " 天 " + diffHours + " 小时 " + diffMinutes + " 分钟 " + diffSeconds + " 秒🦉" ; } show_runtime(); // 初次调用函数以启动定时器 }); </script> </center>
这个其实就是手写了一段带 js 的 html,之后在渲染的时候会被解析并且嵌入到页脚部分,从上到下分为三行:
文章创建者与使用主题
网站与页面访问次数,使用不蒜子 插件进行统计
营业时间,硬编码了起始时间,然后根据当前时间作差,每秒钟更新一次(当然没有考虑太多的时区问题)
数据信息
由于 stellar 主题本身不支持展示网页数据,并且在配置文件中是很难拿到博客数量以及字数等信息的,因此需要直接修改主题源码,在渲染 html 的时候添加一个元素即可,具体来说
首先下载 hexo-wordcount 插件,其中提供了统计字数的功能:
1
2
3
npm install hexo-wordcount --save yarn add hexo-wordcount
之后修改 ./themes/stellar/layout/_partial/main/footer.ejs 文件,在 el += '</div></footer>' 前添加一行,修改后的代码应为:
1
2
3
4
5
6
7
8
if (content) {el += markdown (content) } el += '<center> <span class="totalcount">共发表 ' + site.posts .length + ' 篇 Blog(s) · </span><span class="post-count">总计 ' + totalcount (site) + ' 字</span></center><br/>' el += '</div></footer>' return el
然后就可以改一些样式了,可以在 ./themes/stellar/source/css/_custom.styl 文件中添加自己喜爱的 css 类选择器来修改这几个 span 的样式,我用的是这样的(但好像就是默认):
1
2
3
4
5
6
7
8
9
10
11
12
.post-count { scrollbar-width : none; color : var (--text-p2); } .totalcount { color : var (--text-p2); } .page-footer { text-align : center; margin : 0 auto; width : 100% ; }
banner 显示信息
主要是在页眉 banner 处多展示一些信息,包括发布时间、字数、标签等
首先还是下载 hexo-wordcount 插件,方法同上
之后修改 ./themes/stellar/layout/_partial/main/navbar/article_banner.ejs 文件,在 el += partial('dateinfo') 后添加内容,修改后代码为:
1 2 3 4 5 6 7 8 9 10 11 12 13 14 15 16 17 18 19 el += partial ('dateinfo' ) el += '<div class="flex-row" id="page-words"><span style="padding: 4px;">本文:' + wordcount (page.content ) + '字</span><span class="sep updated" style="padding: 4px;"></span><span class="text updated" style="padding: 4px;">阅读时长:' + min2read (page.content ) + '分</span></div>' ; if (page.layout == "post" && page.tags && page.tags .length > 0 ) { el += '<div class="flex-row" id="tag">' ; el += ' <span> 标签:</span>' ; el += list_categories (page.tags , { class : "cap breadcrumb" , show_count : false , separator : ' ' , style : "none" }); el += ' </div>' ; } el += `</div>`
之后可以修改一下样式,实现一些信息的悬浮显示效果,也是修改 ./themes/stellar/source/css/_custom.styl 文件,在其中添加:
1
2
3
4
5
6
7
8
9
.bread-nav div #page-words span .sep :before { content : '|' ; } .bread-nav div #page-words span .updated { visibility : hidden; } .bread-nav :hover div #page-words span .updated { visibility : visible; }
一些小组件
stellar 组件支持我们自定义小组件,用于放置在页面的左右两侧;定义方法为,在 ./themes/stellar/_data/widgets.yml 下写明配置即可,格式为:
1
2
3
4
5
WIDGET_NAME: layout: markdown title: widget_title content: widget_content
其中布局模板的详细选项可以参见官网 ,自定义组件一般常用 mardkown,表示组件的 content 可以是任意 markdown 格式的文本
组件使用方法
在主题根目录下的模板配置文件中可以看到有如下一段代码:
不同页面显示的默认结构 1 2 3 4 5 6 7 8 9 10 11 12 13 14 15 16 17 18 19 20 21 22 23 24 25 26 27 28 29 30 31 32 33 34 35 36 37 38 39 40 41 42 43 44 45 46 47 48 49 50 51 52 53 54 55 56 57 58 site_tree: home: leftbar: welcome, recent rightbar: index_blog: base_dir: blog menu_id: post leftbar: welcome, recent rightbar: nav_tabs: index_topic: base_dir: topic menu_id: post index_wiki: base_dir: wiki menu_id: wiki leftbar: related, recent rightbar: nav_tabs: post: menu_id: post leftbar: related, recent rightbar: ghrepo, toc topic: menu_id: post wiki: menu_id: wiki leftbar: tree, related, recent rightbar: ghrepo, toc author: base_dir: author menu_id: post leftbar: recent, timeline rightbar: timeline error_page: menu_id: post '404': '/404.html' leftbar: recent, timeline rightbar: timeline page: leftbar: recent rightbar: toc
其中的 leftbar, rightbar 分别代表页面左右侧边显示的组件,例如 site_tree.post.leftbar=['related', 'recent'],即博客页面左侧栏应该会展示相关文章 与最近更新文章 两部分,但是似乎相关文章要求的是所有 tag 都相同,所以我的博客中并不能看到这部分
想要在某类页面插入组件,只需要在配置文件中修改其 leftbar, righebar 的属性值即可,如果需要对某一些特定的网页进行配置,可以在这一页的信息头中进行覆盖即可,例如我想让 about 页面右侧显示 github 用户信息,和博客页面不相同,可以直接在开头写上:
1 rightbar: [welcome , ghuser ]
Github 用户组件
这个其实是一个自带的组件,默认已经存在于 ./themes/stellar/_data/widgets.yml 中,使用时将其中的 ghuser.username 改成自己的 github 用户名即可
welcome 组件
一句欢迎词,加上调今日诗词API 拿到的随机诗词,具体配置为:
1
2
3
4
5
6
7
8
9
welcome: layout: markdown title: 🎉欢迎 content: | 加载缓慢请耐心等待,欢迎大家畅所欲言! <hr style="border: 1px solid black; background-color: black;"> <span id="jinrishici-sentence"></span> <script src="https://sdk.jinrishici.com/v2/browser/jinrishici.js" charset="utf-8"></script> <br></br>
静态 PDF
我的简历是在 overleaf 上写的,迁移到博客上比较麻烦,就想着能不能贴一个静态 PDF,找了一圈之后发现两种主要思路,hexo-pdf 与 pdf.js,前者似乎已经很长时间没有维护,因此选用后者,在 stellar 主题下的使用方法为:
在 ./source 目录下创建文件 myjs,用这个名字是为后面添加其他 js 目录做准备
从官网 下载 pdf.js 源码,并解压到 ./source/myjs 下
修改博客配置文件 ./_config.yml,为其中的 skip_render 添加一栏,防止 myjs 文件夹下的 md 文件被当成博客渲染,修改后为:
在 ./source 目录下找一个目录用来存放静态 pdf,我用的是 ./source/assets/pdf,assets 目录是我创建用来存放图片等静态资源的
在博客中,使用如下语句来嵌入静态 pdf
1 <iframe src ="/myjs/pdfjs/web/viewer.html?file=/assets/pdf/cv.pdf" style ='width:100%;height:800px' > </iframe >
这样就完成了 PDF 的嵌入
在 iframe 标签中,src 部分由 ? 分为两部分,前半部分是 pdfjs 插件相对 ./source 的路径,后半部分是 pdf 文件相对 ./source 的路径
配置短 URL
hexo 默认的文章 URL 会是 :year/:month/:day/:title.html,这导致前缀很不清晰,并且如果我们想使用中文博客名,在微信发送 URL 给别人的时候就会出现 https://ywang.top/2025/08/31/%E6%8E%A8%E5%85%8D%E8%BF%87%E7%A8%8B%E8%AE%B0%E5%BD%95/ 这种奇妙的 UTF-8 编码,极大地降低了好兄弟点进去看的可能性,而 hexo-addrlink 可以帮我们解决这个问题,配置方法如下:
首先使用 npm 下载:npm install hexo-addrlink --save
之后修改 ./_config.yml,改变不同页面的永久链接生成规则:
1 2 3 4 permalink: :year/:month/:day/:title.html permalink: posts/:abbrlink.html
最后在 ./_config.yml 里面配置一下 hexo-addrlink,添加:
1 2 3 4 5 6 7 abbrlink: alg: crc32 rep: hex drafts: false force: false writeback: true
之后依次执行:
等待部署完成之后即可